将文本分类为标签
标签分类是指使用以下类别对文档进行标注:
- 情感
- 语言
- 风格(正式、非正式等)
- 涉及主题
- 政治倾向
概述
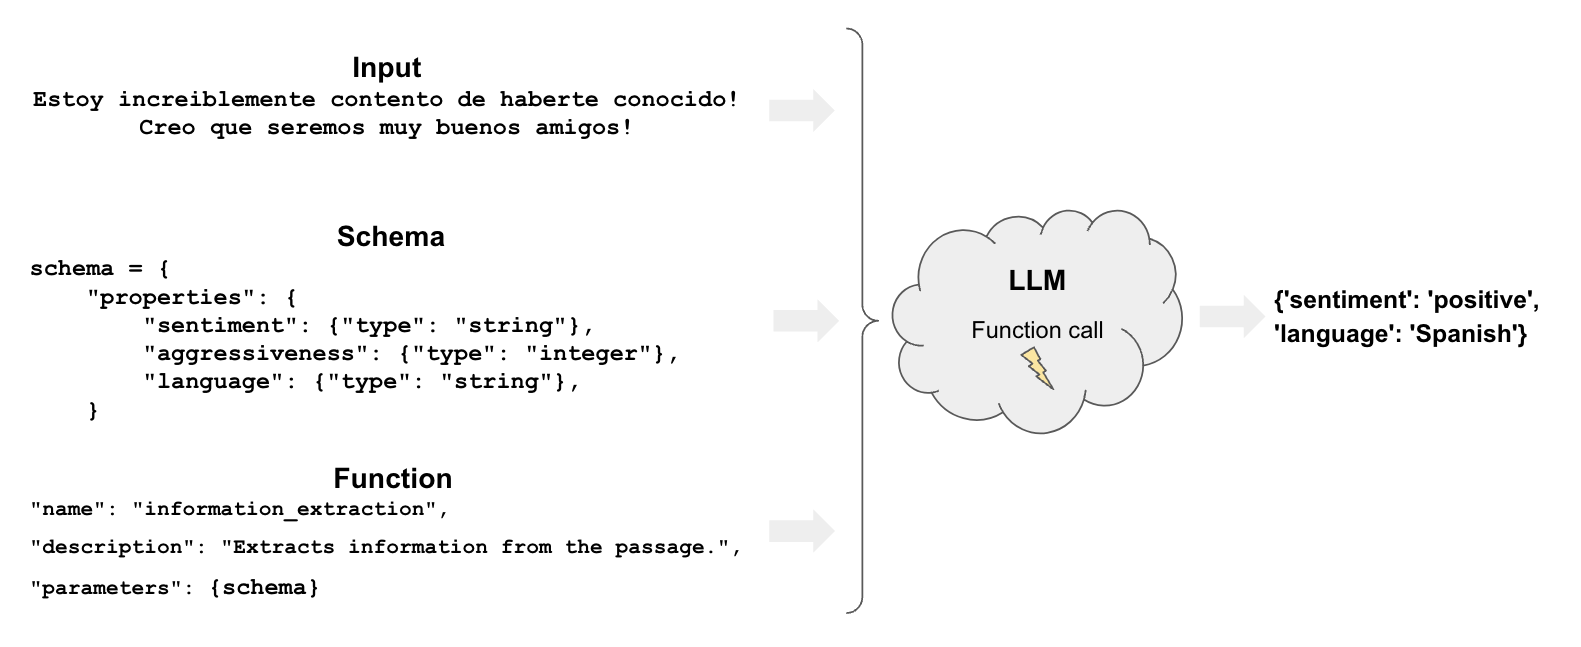
标签分类包含以下几个组成部分:
快速开始
让我们来看一个使用工具调用在 LangChain
中进行标签分类的简单示例。我们将使用.withStructuredOutput(),该功能支持选定的聊天模型。
Pick your chat model:
- Groq
- OpenAI
- Anthropic
- Google Gemini
- FireworksAI
- MistralAI
- VertexAI
Install dependencies
- npm
- yarn
- pnpm
npm i @langchain/groq
yarn add @langchain/groq
pnpm add @langchain/groq
Add environment variables
GROQ_API_KEY=your-api-key
Instantiate the model
import { ChatGroq } from "@langchain/groq";

const llm = new ChatGroq({
  model: "llama-3.3-70b-versatile",
  temperature: 0
});
Install dependencies
- npm
- yarn
- pnpm
npm i @langchain/openai
yarn add @langchain/openai
pnpm add @langchain/openai
Add environment variables
OPENAI_API_KEY=your-api-key
Instantiate the model
import { ChatOpenAI } from "@langchain/openai";

const llm = new ChatOpenAI({
  model: "gpt-4o-mini",
  temperature: 0
});
Install dependencies
- npm
- yarn
- pnpm
npm i @langchain/anthropic
yarn add @langchain/anthropic
pnpm add @langchain/anthropic
Add environment variables
ANTHROPIC_API_KEY=your-api-key
Instantiate the model
import { ChatAnthropic } from "@langchain/anthropic";

const llm = new ChatAnthropic({
  model: "claude-3-5-sonnet-20240620",
  temperature: 0
});
Install dependencies
- npm
- yarn
- pnpm
npm i @langchain/google-genai
yarn add @langchain/google-genai
pnpm add @langchain/google-genai
Add environment variables
GOOGLE_API_KEY=your-api-key
Instantiate the model
import { ChatGoogleGenerativeAI } from "@langchain/google-genai";

const llm = new ChatGoogleGenerativeAI({
  model: "gemini-2.0-flash",
  temperature: 0
});
Install dependencies
- npm
- yarn
- pnpm
npm i @langchain/community
yarn add @langchain/community
pnpm add @langchain/community
Add environment variables
FIREWORKS_API_KEY=your-api-key
Instantiate the model
import { ChatFireworks } from "@langchain/community/chat_models/fireworks";

const llm = new ChatFireworks({
  model: "accounts/fireworks/models/llama-v3p1-70b-instruct",
  temperature: 0
});
Install dependencies
- npm
- yarn
- pnpm
npm i @langchain/mistralai
yarn add @langchain/mistralai
pnpm add @langchain/mistralai
Add environment variables
MISTRAL_API_KEY=your-api-key
Instantiate the model
import { ChatMistralAI } from "@langchain/mistralai";

const llm = new ChatMistralAI({
  model: "mistral-large-latest",
  temperature: 0
});
Install dependencies
- npm
- yarn
- pnpm
npm i @langchain/google-vertexai
yarn add @langchain/google-vertexai
pnpm add @langchain/google-vertexai
Add environment variables
GOOGLE_APPLICATION_CREDENTIALS=credentials.json
Instantiate the model
import { ChatVertexAI } from "@langchain/google-vertexai";

const llm = new ChatVertexAI({
  model: "gemini-1.5-flash",
  temperature: 0
});
让我们使用 Zod 定义一个包含一些属性及其预期类型的模式。
import { ChatPromptTemplate } from "@langchain/core/prompts";
import { z } from "zod";

const taggingPrompt = ChatPromptTemplate.fromTemplate(
  `从以下段落中提取所需信息。

仅提取“分类”函数中提到的属性。

段落:
{input}
`
);

const classificationSchema = z.object({
  sentiment: z.string().describe("文本的情感倾向"),
  aggressiveness: z.number().int().describe("文本的攻击性程度,范围从1到10"),
  language: z.string().describe("文本所使用的语言"),
});

// 名称是可选的,但可以给模型提供更多关于你的模式代表什么的线索
const llmWihStructuredOutput = llm.withStructuredOutput(classificationSchema, {
  name: "extractor",
});
const prompt1 = await taggingPrompt.invoke({
  input:
    "Estoy increiblemente contento de haberte conocido! Creo que seremos muy buenos amigos!",
});
await llmWihStructuredOutput.invoke(prompt1);
{ sentiment: 'positive', aggressiveness: 1, language: 'Spanish' }
正如我们在示例中看到的,它正确地解释了我们的需求。
结果会有所不同,例如我们可能会得到不同语言的情感结果(如’positive’、’enojado’等)。
我们将在下一节中了解如何控制这些结果。
更精细的控制
精心定义的模式使我们能够更好地控制模型的输出。
具体来说,我们可以定义:
- 每个属性的可能值
- 描述以确保模型理解该属性
- 需要返回的属性
现在我们重新声明我们的 Zod 模式,使用枚举来控制之前提到的每个方面:
import { z } from "zod";

const classificationSchema2 = z.object({
  sentiment: z.enum(["happy", "neutral", "sad"]).describe("文本的情感倾向"),
  aggressiveness: z
    .number()
    .int()
    .describe("描述语句的攻击性程度,范围从1到5。数值越高越具攻击性"),
  language: z
    .enum(["spanish", "english", "french", "german", "italian"])
    .describe("文本所使用的语言"),
});
const taggingPrompt2 = ChatPromptTemplate.fromTemplate(
  `从以下段落中提取所需信息。

仅提取“分类”函数中提到的属性。

段落:
{input}
`
);

const llmWithStructuredOutput2 = llm.withStructuredOutput(
  classificationSchema2,
  { name: "extractor" }
);
现在答案将按照我们预期的方式进行限制!
const prompt2 = await taggingPrompt2.invoke({
  input:
    "Estoy increiblemente contento de haberte conocido! Creo que seremos muy buenos amigos!",
});
await llmWithStructuredOutput2.invoke(prompt2);
{ sentiment: 'happy', aggressiveness: 1, language: 'spanish' }
const prompt3 = await taggingPrompt2.invoke({
  input: "Estoy muy enojado con vos! Te voy a dar tu merecido!",
});
await llmWithStructuredOutput2.invoke(prompt3);
{ sentiment: 'sad', aggressiveness: 5, language: 'spanish' }
const prompt4 = await taggingPrompt2.invoke({
  input: "Weather is ok here, I can go outside without much more than a coat",
});
await llmWithStructuredOutput2.invoke(prompt4);
{ sentiment: 'neutral', aggressiveness: 1, language: 'english' }
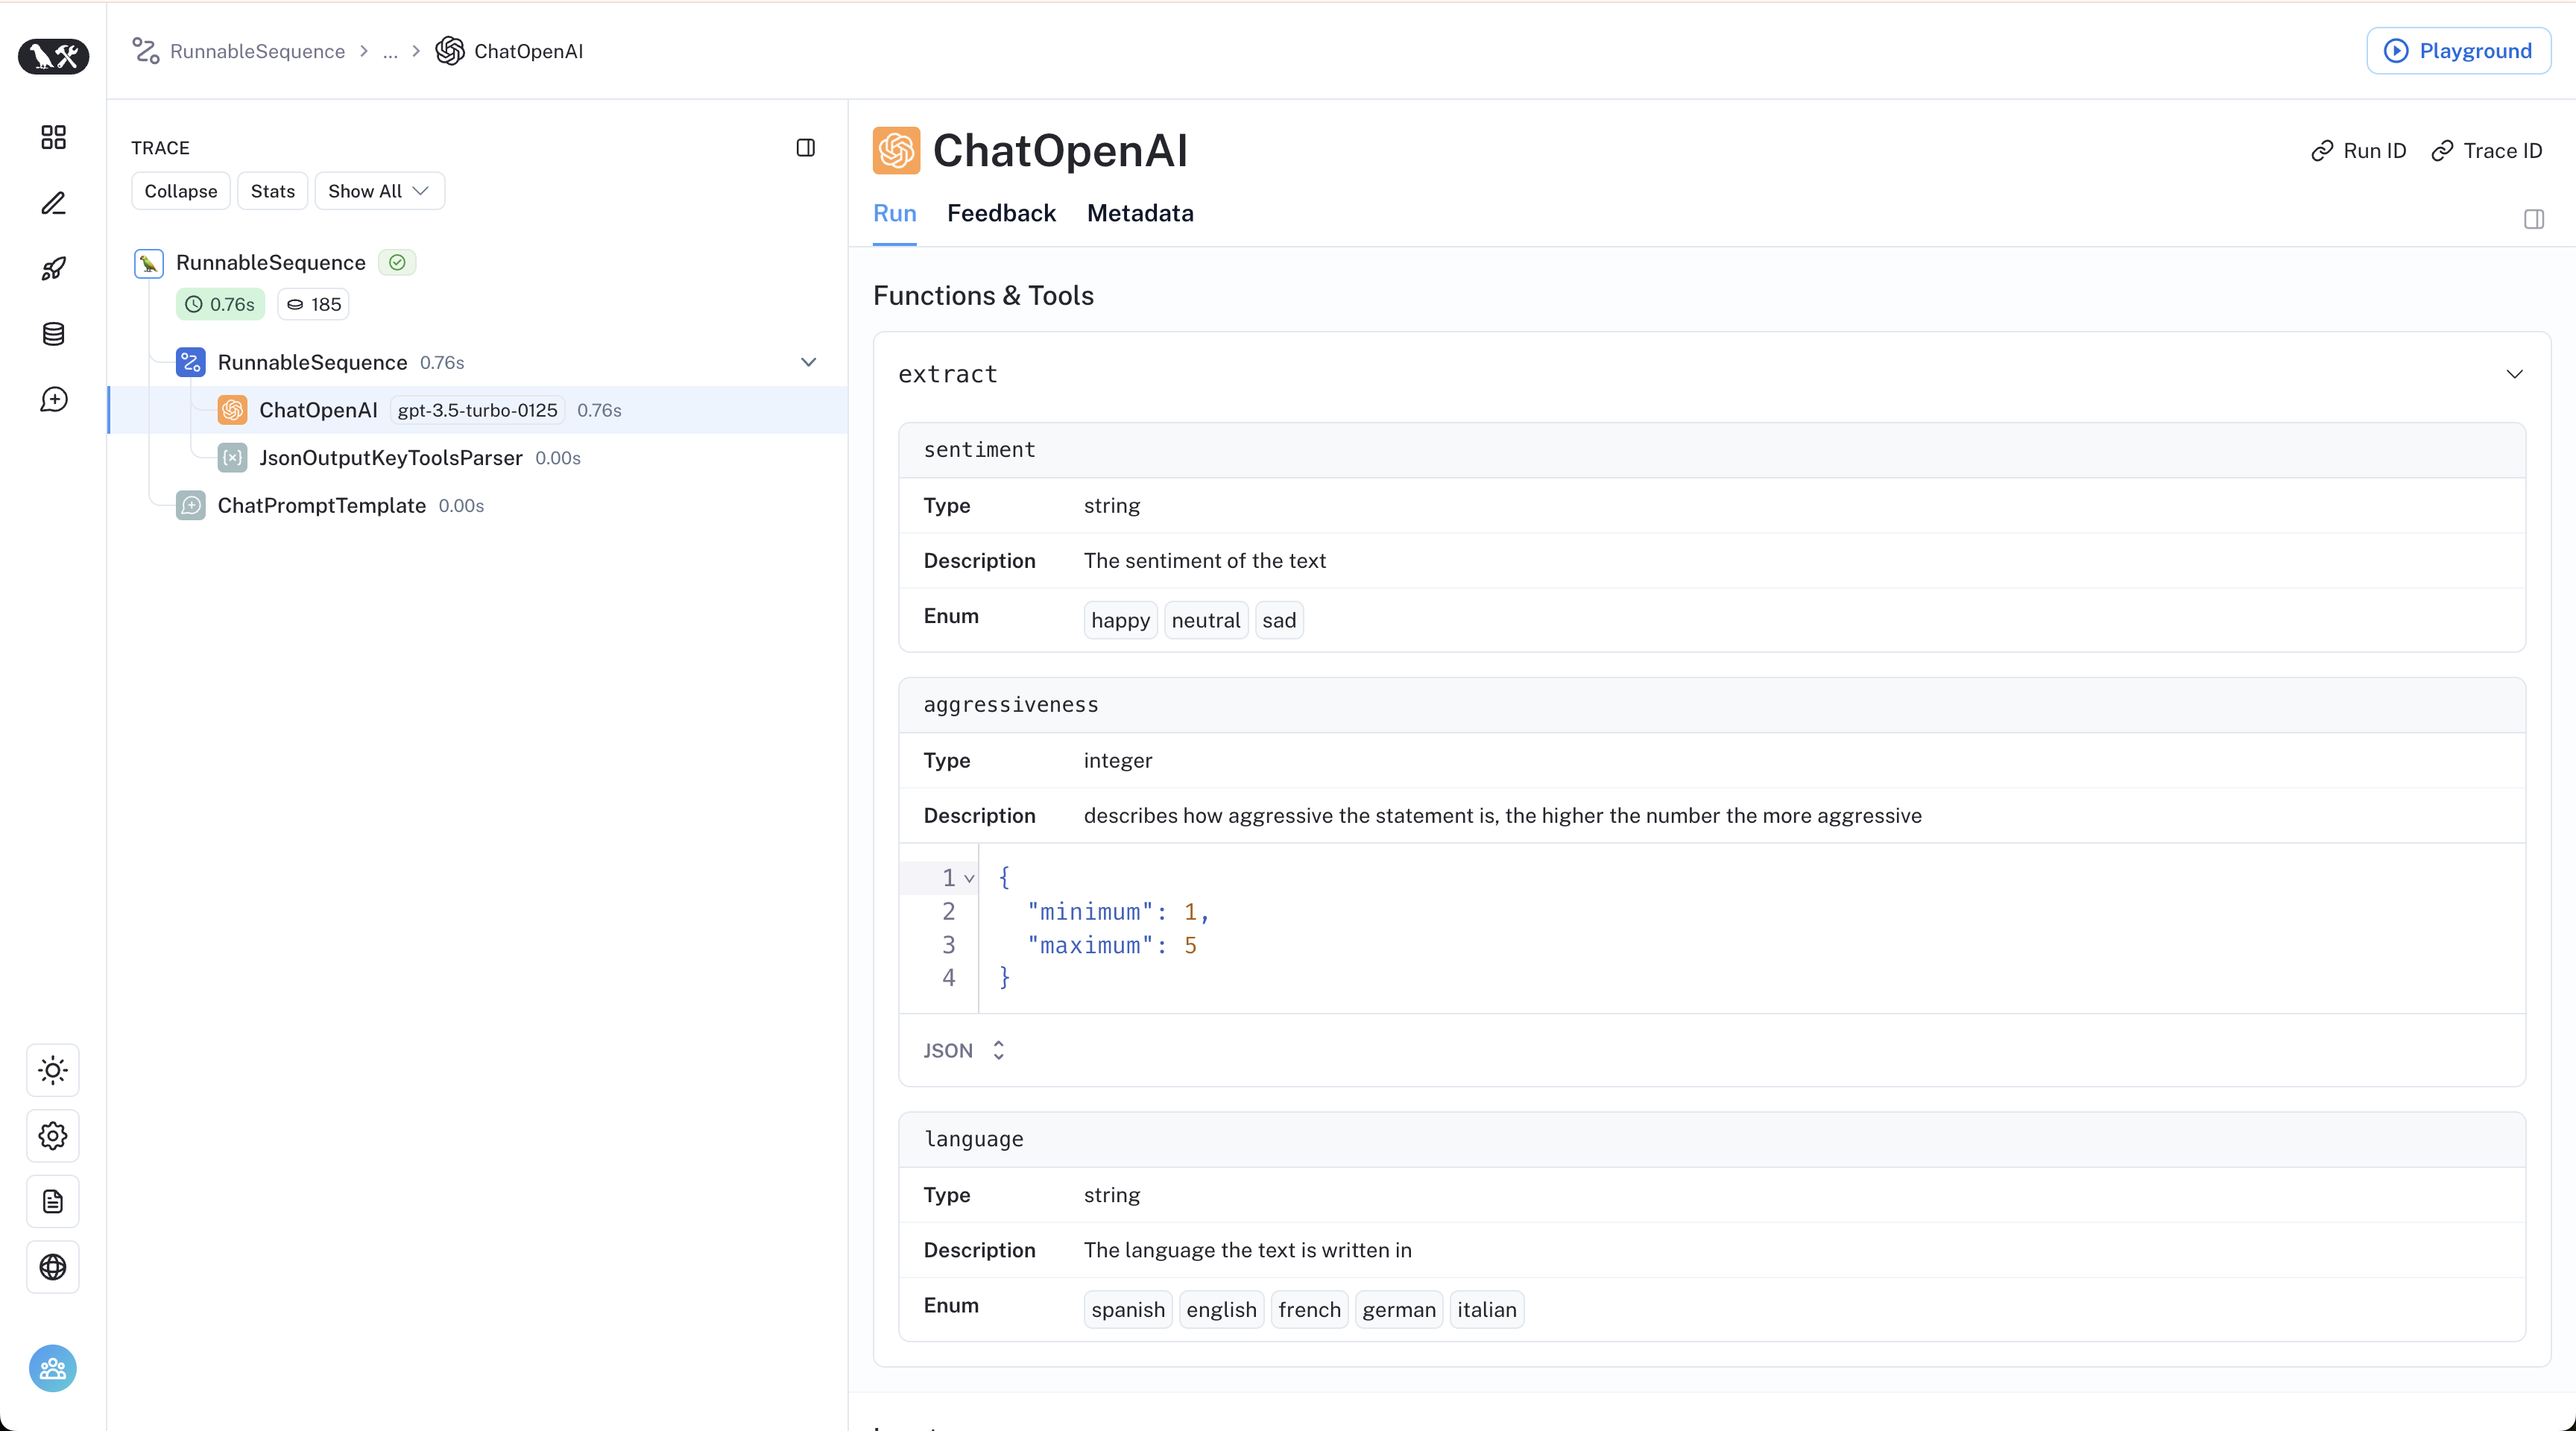
通过 LangSmith 跟踪链接,我们可以查看其内部执行情况: