构建一个检索增强生成(RAG)应用:第一部分
由大语言模型(LLM)赋能的最强大应用之一是复杂的问答(Q&A)聊天机器人。这类应用能够回答关于特定信息源的问题。这些应用使用一种称为检索增强生成(Retrieval Augmented Generation,简称 RAG)的技术,或称为 RAG。
这是一个多部分教程:
本教程将展示如何构建一个简单的问答应用 针对文本数据源。在此过程中,我们将介绍一个典型的问答 架构,并介绍更多高级问答技术的附加资源。我们还将看到 LangSmith 如何帮助我们追踪和理解我们的应用。 随着我们的应用复杂度增加,LangSmith 将变得越来越有用。
如果您已经熟悉基本的检索,您可能也会对 这个 不同检索技术的高层次概述 感兴趣。
注意:这里我们专注于非结构化数据的问答。如果您对结构化数据上的 RAG 感兴趣,请查看我们的教程:针对 SQL 数据的问答。
概览
典型的 RAG 应用有两个主要组成部分:
索引:一个用于从信息源中提取数据并建立索引的流水线。这通常在离线状态下进行。
检索与生成:实际的 RAG 链条,它在运行时接收用户查询,从索引中检索相关数据,然后将这些数据传递给模型。
注意:本教程的索引部分将主要遵循 语义搜索教程。
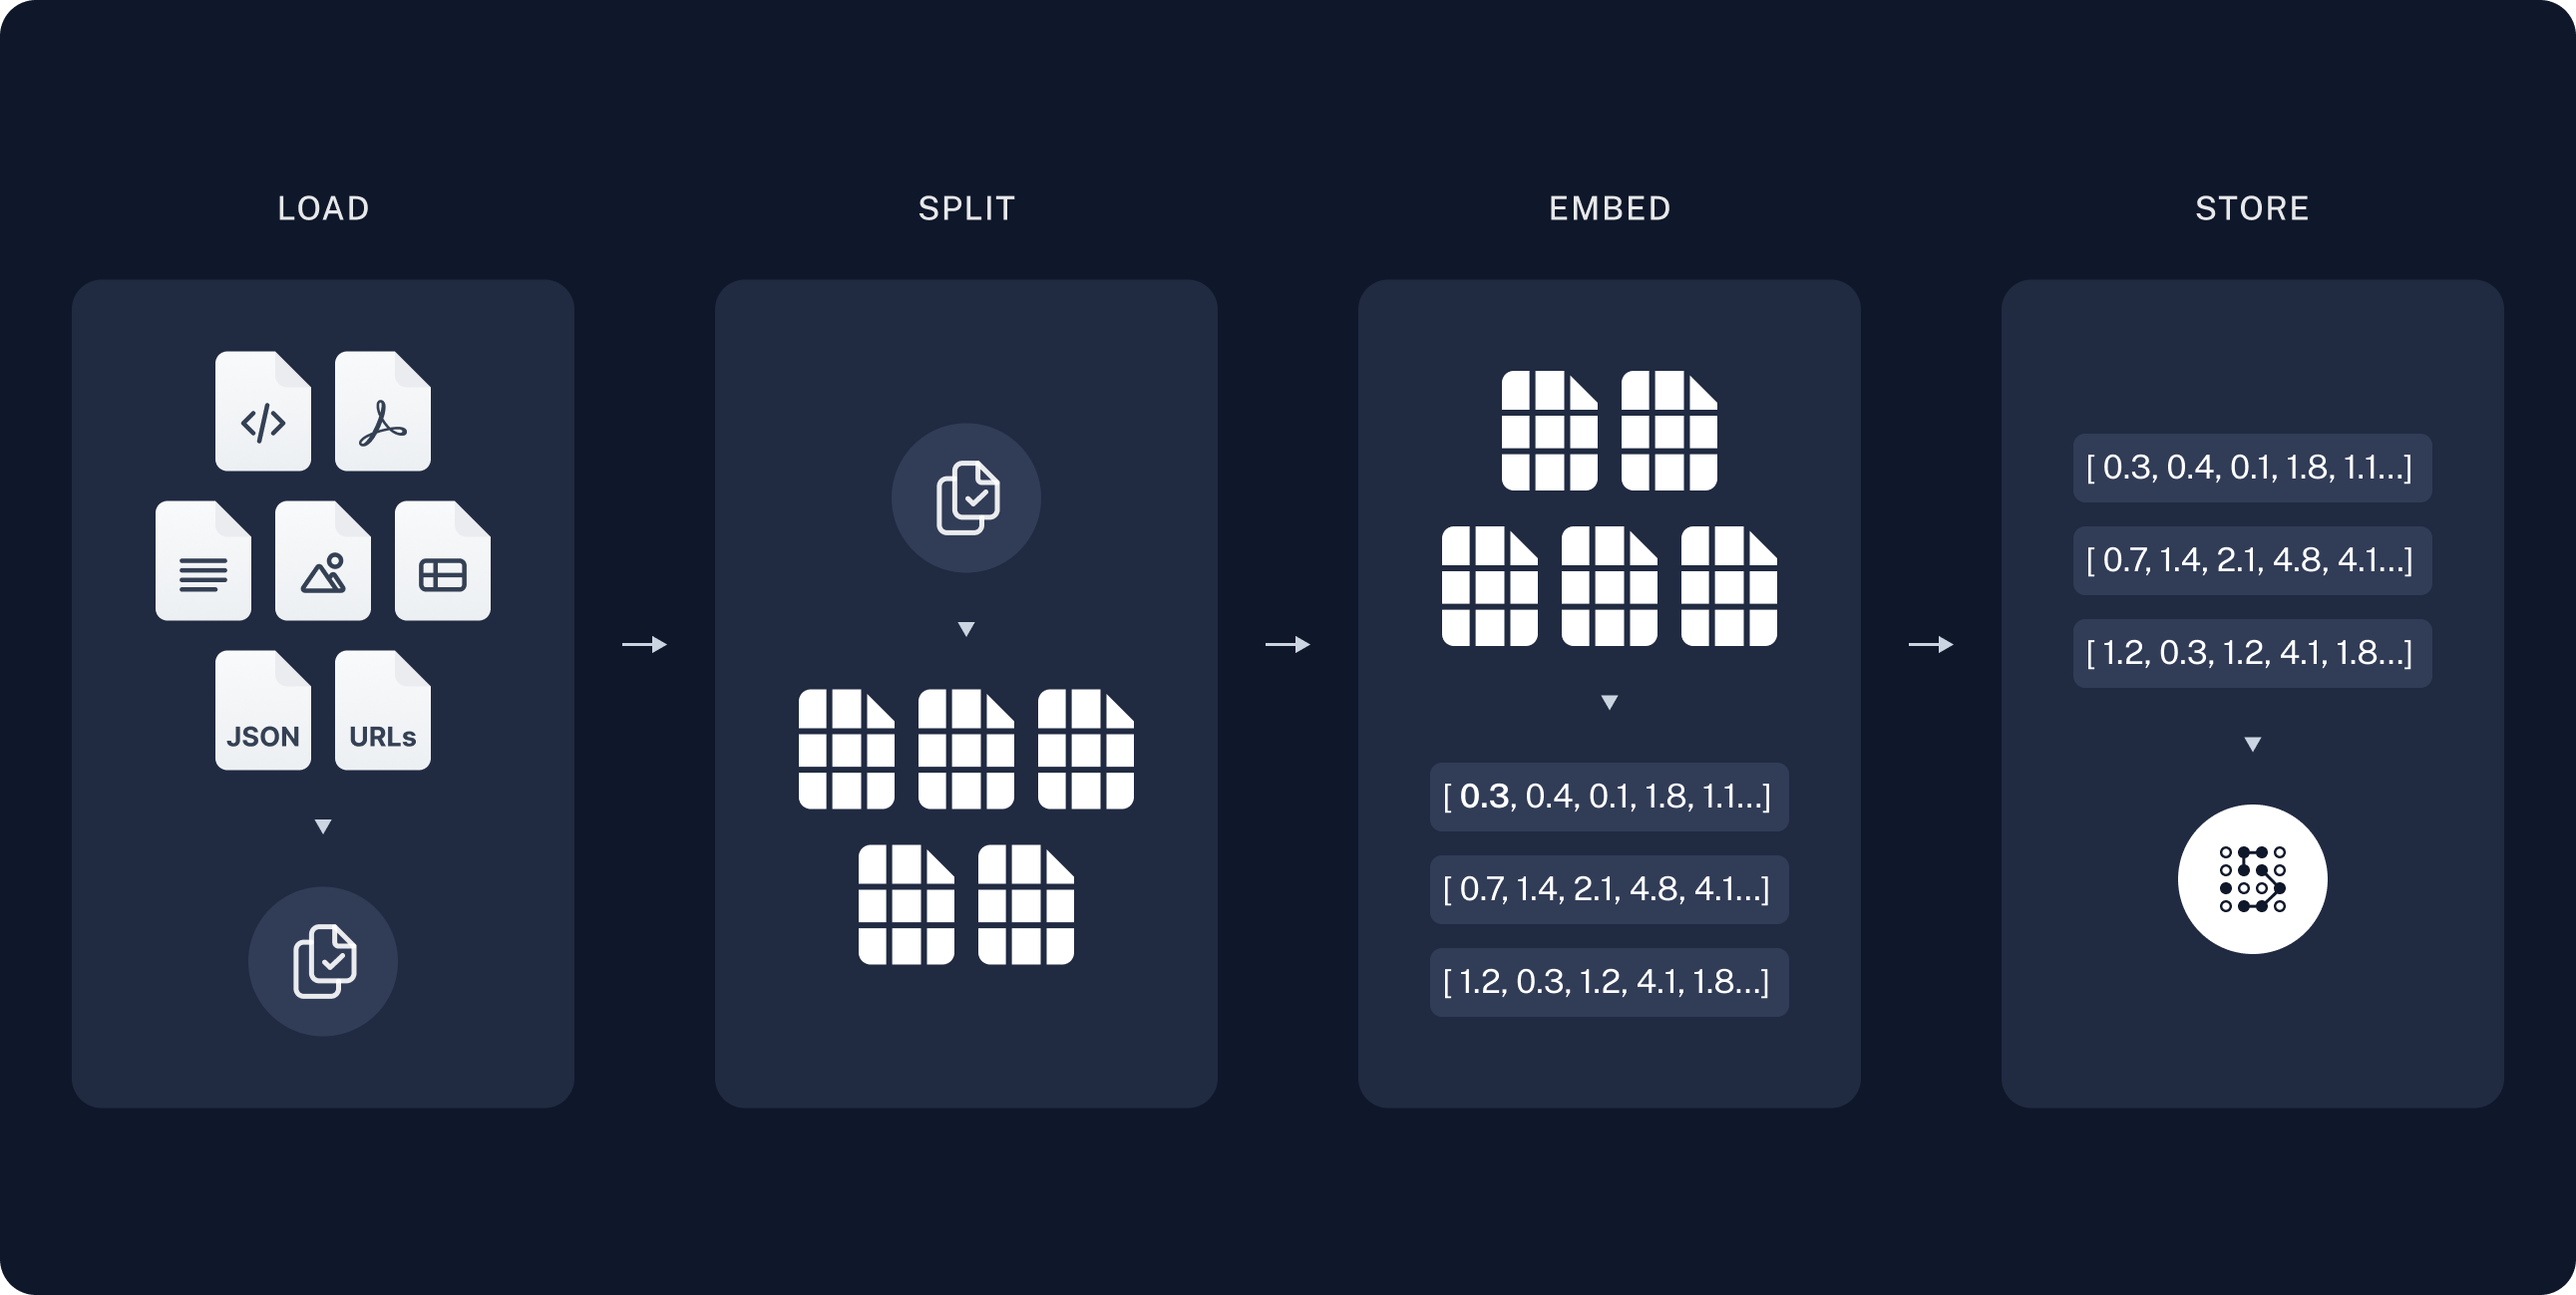
从原始数据到答案的最常见完整流程如下所示:
索引
- 加载:首先我们需要加载数据。这通过 文档加载器 来完成。
- 拆分:文本拆分器 将大型
文档拆分为更小的块。这对于索引数据和传递给模型都很有用,因为较大的块难以搜索,而且无法适应模型有限的上下文窗口。 - 存储:我们需要一个地方来存储和索引我们的拆分块,以便以后可以进行搜索。这通常使用 向量存储 和 嵌入模型 来完成。
检索与生成
- 检索:给定一个用户输入,使用 检索器 从存储中检索相关的拆分块。
- 生成:使用包含问题和检索到的数据的提示,由 聊天模型 / 大语言模型(LLM) 生成答案。
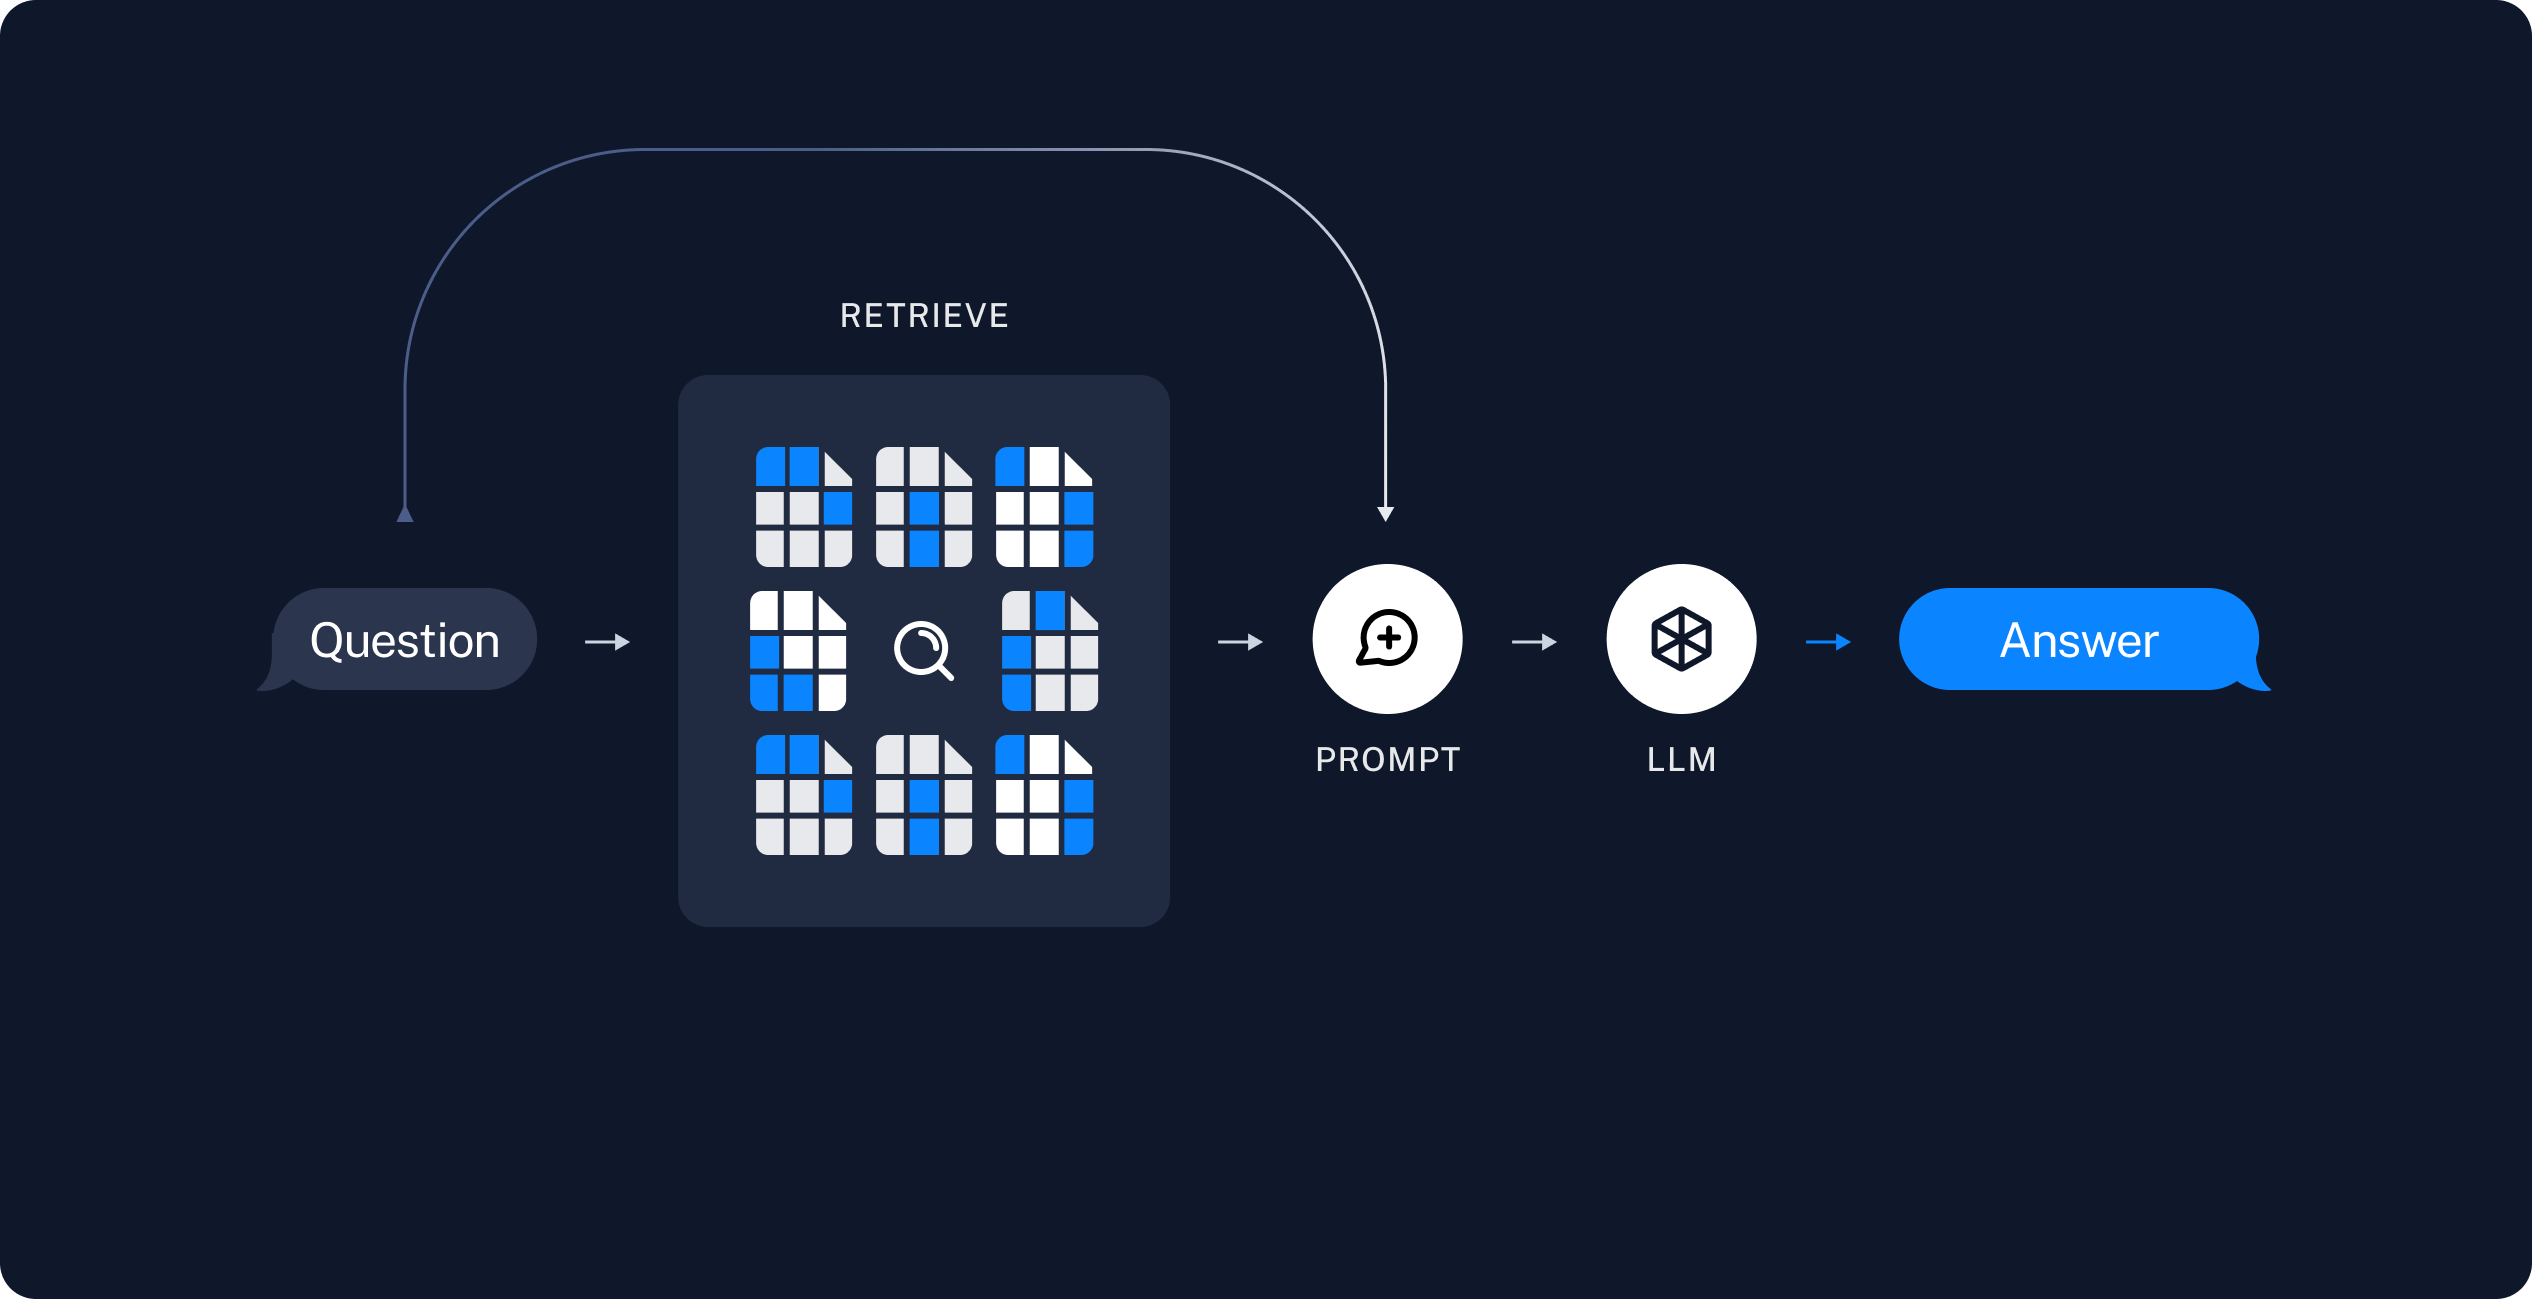
一旦我们完成了数据的索引,我们将使用 LangGraph 作为我们的编排框架来实现检索和生成步骤。
准备工作
Jupyter Notebook
本教程和其他教程或许最方便在 Jupyter Notebook 中运行。在交互式环境中学习指南是更好地理解它们的好方法。有关安装说明,请参阅 此处。
安装
本指南需要以下依赖项:
- npm
- yarn
- pnpm
npm i langchain @langchain/core @langchain/langgraph
yarn add langchain @langchain/core @langchain/langgraph
pnpm add langchain @langchain/core @langchain/langgraph
如需更多详细信息,请参阅我们的 安装指南。
LangSmith
你使用 LangChain 构建的许多应用将包含多个步骤,并涉及多次调用 LLM。 随着这些应用变得越来越复杂,能够检查链或代理内部发生的事情变得至关重要。 最佳方式是使用 LangSmith。
在上方链接注册后,请确保设置您的环境变量以开始记录追踪信息:
export LANGSMITH_TRACING="true"
export LANGSMITH_API_KEY="..."

# 如果您不在无服务器环境中,可减少追踪延迟
# export LANGCHAIN_CALLBACKS_BACKGROUND=true
组件
我们需要从 LangChain 的集成套件中选择三个组件。
一个 聊天模型:
Pick your chat model:
- Groq
- OpenAI
- Anthropic
- Google Gemini
- FireworksAI
- MistralAI
- VertexAI
Install dependencies
- npm
- yarn
- pnpm
npm i @langchain/groq
yarn add @langchain/groq
pnpm add @langchain/groq
Add environment variables
GROQ_API_KEY=your-api-key
Instantiate the model
import { ChatGroq } from "@langchain/groq";

const llm = new ChatGroq({
  model: "llama-3.3-70b-versatile",
  temperature: 0
});
Install dependencies
- npm
- yarn
- pnpm
npm i @langchain/openai
yarn add @langchain/openai
pnpm add @langchain/openai
Add environment variables
OPENAI_API_KEY=your-api-key
Instantiate the model
import { ChatOpenAI } from "@langchain/openai";

const llm = new ChatOpenAI({
  model: "gpt-4o-mini",
  temperature: 0
});
Install dependencies
- npm
- yarn
- pnpm
npm i @langchain/anthropic
yarn add @langchain/anthropic
pnpm add @langchain/anthropic
Add environment variables
ANTHROPIC_API_KEY=your-api-key
Instantiate the model
import { ChatAnthropic } from "@langchain/anthropic";

const llm = new ChatAnthropic({
  model: "claude-3-5-sonnet-20240620",
  temperature: 0
});
Install dependencies
- npm
- yarn
- pnpm
npm i @langchain/google-genai
yarn add @langchain/google-genai
pnpm add @langchain/google-genai
Add environment variables
GOOGLE_API_KEY=your-api-key
Instantiate the model
import { ChatGoogleGenerativeAI } from "@langchain/google-genai";

const llm = new ChatGoogleGenerativeAI({
  model: "gemini-2.0-flash",
  temperature: 0
});
Install dependencies
- npm
- yarn
- pnpm
npm i @langchain/community
yarn add @langchain/community
pnpm add @langchain/community
Add environment variables
FIREWORKS_API_KEY=your-api-key
Instantiate the model
import { ChatFireworks } from "@langchain/community/chat_models/fireworks";

const llm = new ChatFireworks({
  model: "accounts/fireworks/models/llama-v3p1-70b-instruct",
  temperature: 0
});
Install dependencies
- npm
- yarn
- pnpm
npm i @langchain/mistralai
yarn add @langchain/mistralai
pnpm add @langchain/mistralai
Add environment variables
MISTRAL_API_KEY=your-api-key
Instantiate the model
import { ChatMistralAI } from "@langchain/mistralai";

const llm = new ChatMistralAI({
  model: "mistral-large-latest",
  temperature: 0
});
Install dependencies
- npm
- yarn
- pnpm
npm i @langchain/google-vertexai
yarn add @langchain/google-vertexai
pnpm add @langchain/google-vertexai
Add environment variables
GOOGLE_APPLICATION_CREDENTIALS=credentials.json
Instantiate the model
import { ChatVertexAI } from "@langchain/google-vertexai";

const llm = new ChatVertexAI({
  model: "gemini-1.5-flash",
  temperature: 0
});
一个嵌入模型:
Pick your embedding model:
- OpenAI
- Azure
- AWS
- VertexAI
- MistralAI
- Cohere
Install dependencies
- npm
- yarn
- pnpm
npm i @langchain/openai
yarn add @langchain/openai
pnpm add @langchain/openai
OPENAI_API_KEY=your-api-key
import { OpenAIEmbeddings } from "@langchain/openai";

const embeddings = new OpenAIEmbeddings({
  model: "text-embedding-3-large"
});
Install dependencies
- npm
- yarn
- pnpm
npm i @langchain/openai
yarn add @langchain/openai
pnpm add @langchain/openai
AZURE_OPENAI_API_INSTANCE_NAME=<YOUR_INSTANCE_NAME>
AZURE_OPENAI_API_KEY=<YOUR_KEY>
AZURE_OPENAI_API_VERSION="2024-02-01"
import { AzureOpenAIEmbeddings } from "@langchain/openai";

const embeddings = new AzureOpenAIEmbeddings({
  azureOpenAIApiEmbeddingsDeploymentName: "text-embedding-ada-002"
});
Install dependencies
- npm
- yarn
- pnpm
npm i @langchain/aws
yarn add @langchain/aws
pnpm add @langchain/aws
BEDROCK_AWS_REGION=your-region
import { BedrockEmbeddings } from "@langchain/aws";

const embeddings = new BedrockEmbeddings({
  model: "amazon.titan-embed-text-v1"
});
Install dependencies
- npm
- yarn
- pnpm
npm i @langchain/google-vertexai
yarn add @langchain/google-vertexai
pnpm add @langchain/google-vertexai
GOOGLE_APPLICATION_CREDENTIALS=credentials.json
import { VertexAIEmbeddings } from "@langchain/google-vertexai";

const embeddings = new VertexAIEmbeddings({
  model: "text-embedding-004"
});
Install dependencies
- npm
- yarn
- pnpm
npm i @langchain/mistralai
yarn add @langchain/mistralai
pnpm add @langchain/mistralai
MISTRAL_API_KEY=your-api-key
import { MistralAIEmbeddings } from "@langchain/mistralai";

const embeddings = new MistralAIEmbeddings({
  model: "mistral-embed"
});
Install dependencies
- npm
- yarn
- pnpm
npm i @langchain/cohere
yarn add @langchain/cohere
pnpm add @langchain/cohere
COHERE_API_KEY=your-api-key
import { CohereEmbeddings } from "@langchain/cohere";

const embeddings = new CohereEmbeddings({
  model: "embed-english-v3.0"
});
以及一个向量存储:
Pick your vector store:
- Memory
- Chroma
- FAISS
- MongoDB
- PGVector
- Pinecone
- Qdrant
Install dependencies
- npm
- yarn
- pnpm
npm i langchain
yarn add langchain
pnpm add langchain
import { MemoryVectorStore } from "langchain/vectorstores/memory";

const vectorStore = new MemoryVectorStore(embeddings);
Install dependencies
- npm
- yarn
- pnpm
npm i @langchain/community
yarn add @langchain/community
pnpm add @langchain/community
import { Chroma } from "@langchain/community/vectorstores/chroma";

const vectorStore = new Chroma(embeddings, {
  collectionName: "a-test-collection",
});
Install dependencies
- npm
- yarn
- pnpm
npm i @langchain/community
yarn add @langchain/community
pnpm add @langchain/community
import { FaissStore } from "@langchain/community/vectorstores/faiss";

const vectorStore = new FaissStore(embeddings, {});
Install dependencies
- npm
- yarn
- pnpm
npm i @langchain/mongodb
yarn add @langchain/mongodb
pnpm add @langchain/mongodb
import { MongoDBAtlasVectorSearch } from "@langchain/mongodb"
import { MongoClient } from "mongodb";

const client = new MongoClient(process.env.MONGODB_ATLAS_URI || "");
const collection = client
  .db(process.env.MONGODB_ATLAS_DB_NAME)
  .collection(process.env.MONGODB_ATLAS_COLLECTION_NAME);

const vectorStore = new MongoDBAtlasVectorSearch(embeddings, {
  collection: collection,
  indexName: "vector_index",
  textKey: "text",
  embeddingKey: "embedding",
});
Install dependencies
- npm
- yarn
- pnpm
npm i @langchain/community
yarn add @langchain/community
pnpm add @langchain/community
import { PGVectorStore } from "@langchain/community/vectorstores/pgvector";

const vectorStore = await PGVectorStore.initialize(embeddings, {})
Install dependencies
- npm
- yarn
- pnpm
npm i @langchain/pinecone
yarn add @langchain/pinecone
pnpm add @langchain/pinecone
import { PineconeStore } from "@langchain/pinecone";
import { Pinecone as PineconeClient } from "@pinecone-database/pinecone";

const pinecone = new PineconeClient();
const vectorStore = new PineconeStore(embeddings, {
  pineconeIndex,
  maxConcurrency: 5,
});
Install dependencies
- npm
- yarn
- pnpm
npm i @langchain/qdrant
yarn add @langchain/qdrant
pnpm add @langchain/qdrant
import { QdrantVectorStore } from "@langchain/qdrant";

const vectorStore = await QdrantVectorStore.fromExistingCollection(embeddings, {
  url: process.env.QDRANT_URL,
  collectionName: "langchainjs-testing",
});
预览
在本指南中,我们将构建一个可以回答有关网站内容问题的应用程序。我们使用的特定网站是 Lilian Weng 撰写的LLM 驱动的自主代理博客文章, 该文章允许我们针对帖子的内容提出问题。
我们可以创建一个简单的索引管道和 RAG 链,用大约 50 行代码实现此功能。
import "cheerio";
import { CheerioWebBaseLoader } from "@langchain/community/document_loaders/web/cheerio";
import { Document } from "@langchain/core/documents";
import { ChatPromptTemplate } from "@langchain/core/prompts";
import { pull } from "langchain/hub";
import { Annotation, StateGraph } from "@langchain/langgraph";
import { RecursiveCharacterTextSplitter } from "@langchain/textsplitters";


// 加载并分块博客内容
const pTagSelector = "p";
const cheerioLoader = new CheerioWebBaseLoader(
  "https://lilianweng.github.io/posts/2023-06-23-agent/",
  {
    selector: pTagSelector
  }
);

const docs = await cheerioLoader.load();

const splitter = new RecursiveCharacterTextSplitter({
  chunkSize: 1000, chunkOverlap: 200
});
const allSplits = await splitter.splitDocuments(docs);


// 索引分块
await vectorStore.addDocuments(allSplits)

// 定义问答的提示词模板
const promptTemplate = await pull<ChatPromptTemplate>("rlm/rag-prompt");

// 定义应用程序的状态
const InputStateAnnotation = Annotation.Root({
  question: Annotation<string>,
});

const StateAnnotation = Annotation.Root({
  question: Annotation<string>,
  context: Annotation<Document[]>,
  answer: Annotation<string>,
});

// 定义应用程序步骤
const retrieve = async (state: typeof InputStateAnnotation.State) => {
  const retrievedDocs = await vectorStore.similaritySearch(state.question)
  return { context: retrievedDocs };
};


const generate = async (state: typeof StateAnnotation.State) => {
  const docsContent = state.context.map(doc => doc.pageContent).join("\n");
  const messages = await promptTemplate.invoke({ question: state.question, context: docsContent });
  const response = await llm.invoke(messages);
  return { answer: response.content };
};


// 编译应用程序并进行测试
const graph = new StateGraph(StateAnnotation)
  .addNode("retrieve", retrieve)
  .addNode("generate", generate)
  .addEdge("__start__", "retrieve")
  .addEdge("retrieve", "generate")
  .addEdge("generate", "__end__")
  .compile();
let inputs = { question: "什么是任务分解?" };

const result = await graph.invoke(inputs);
console.log(result.answer);
任务分解是将复杂任务分解为更小、更易管理步骤的过程。这可以通过多种方法实现,包括提示大型语言模型(LLM)或使用任务特定指令。诸如思维链(CoT)和思维树(Tree of Thoughts)等技术通过结构化推理并在每一步探索多种可能性,进一步增强了这一过程。
查看 LangSmith 追踪。
详细步骤说明
让我们逐步浏览上面的代码,以真正理解 其中发生的事情。
1. 索引
加载文档
我们首先需要加载博客文章内容。我们可以使用文档加载器,它可以从数据源加载数据并返回一个文档列表。文档是一个包含某些页面内容(string类型)和元数据(Record<string, any>类型)的对象。
在本例中,我们将使用CheerioWebBaseLoader,它使用 cheerio 从网页 URL 加载 HTML 并将其解析为文本。我们可以在构造函数中传递自定义选择器,以便仅解析特定元素:
import "cheerio";
import { CheerioWebBaseLoader } from "@langchain/community/document_loaders/web/cheerio";

const pTagSelector = "p";
const cheerioLoader = new CheerioWebBaseLoader(
  "https://lilianweng.github.io/posts/2023-06-23-agent/",
  {
    selector: pTagSelector,
  }
);

const docs = await cheerioLoader.load();

console.assert(docs.length === 1);
console.log(`Total characters: ${docs[0].pageContent.length}`);
Total characters: 22360
console.log(docs[0].pageContent.slice(0, 500));
Building agents with LLM (large language model) as its core controller is a cool concept. Several proof-of-concepts demos, such as AutoGPT, GPT-Engineer and BabyAGI, serve as inspiring examples. The potentiality of LLM extends beyond generating well-written copies, stories, essays and programs; it can be framed as a powerful general problem solver.In a LLM-powered autonomous agent system, LLM functions as the agent’s brain, complemented by several key components:A complicated task usually involv
深入了解
DocumentLoader: 一个将数据从数据源加载为文档列表的类。
拆分文档
我们加载的文档超过 42,000 个字符,这对于许多模型的上下文窗口来说太长了。即使是那些可以在其上下文窗口中容纳完整文章的模型,也可能在非常长的输入中查找信息时遇到困难。
为了处理这个问题,我们会将 Document
拆分成块进行嵌入和向量存储。这将帮助我们在运行时仅检索博客文章中最相关的部分。
如语义搜索教程中所述,我们使用RecursiveCharacterTextSplitter递归地使用常见的分隔符(如换行符)拆分文档,直到每个块的大小合适为止。这是推荐用于通用文本用例的文本拆分器。
import { RecursiveCharacterTextSplitter } from "@langchain/textsplitters";

const splitter = new RecursiveCharacterTextSplitter({
  chunkSize: 1000,
  chunkOverlap: 200,
});
const allSplits = await splitter.splitDocuments(docs);
console.log(`Split blog post into ${allSplits.length} sub-documents.`);
Split blog post into 29 sub-documents.
深入了解
TextSplitter:将Document列表拆分为更小块的对象,是DocumentTransformers的子类。
DocumentTransformer:对Document列表执行转换的对象。
存储文档
现在我们需要对我们拆分的 66 个文本块进行索引,以便在运行时进行搜索。 根据语义搜索教程,我们的方法是对每个文档拆分的内容进行[嵌入(embed)],并将这些嵌入向量插入到[向量存储(vector store)]中。 对于给定的输入查询,我们可以使用向量搜索来检索相关文档。
我们可以使用在本教程开始时选择的向量存储和嵌入模型,通过一个命令来嵌入并存储我们所有的文档拆分内容。
await vectorStore.addDocuments(allSplits);
深入了解
Embeddings: 文本嵌入模型的封装,用于将文本转换为嵌入向量。-
文档:有关如何使用嵌入的详细文档。-
集成:可选择的 30 多个集成。-
接口:基础接口的 API 参考。
VectorStore: 向量数据库的封装,用于存储和查询嵌入向量。-
文档:有关如何使用向量存储的详细文档。-
集成:可选择的 40 多个集成。-
接口:基础接口的 API 参考。
这完成了管道中的索引部分。此时,我们已经有了一个可查询的向量存储,其中包含我们博客文章的分块内容。对于用户的问题,我们理想上应该能够返回回答该问题的博客文章片段。
2. 检索与生成
现在让我们编写实际的应用程序逻辑。我们想要创建一个简单的 应用程序,该程序接收用户的提问,搜索与该问题相关的 文档,将检索到的文档和初始问题传递给 模型,并返回答案。
在生成方面,我们将使用在本教程开始时选择的聊天模型。
我们将为 RAG 使用一个已提交到 LangChain 提示中心的提示词 (链接)。
import { pull } from "langchain/hub";
import { ChatPromptTemplate } from "@langchain/core/prompts";

const promptTemplate = await pull<ChatPromptTemplate>("rlm/rag-prompt");

// Example:
const example_prompt = await promptTemplate.invoke({
  context: "(context goes here)",
  question: "(question goes here)",
});
const example_messages = example_prompt.messages;

console.assert(example_messages.length === 1);
example_messages[0].content;
You are an assistant for question-answering tasks. Use the following pieces of retrieved context to answer the question. If you don't know the answer, just say that you don't know. Use three sentences maximum and keep the answer concise.
Question: (question goes here)
Context: (context goes here)
Answer:
我们将使用 LangGraph 将检索和生成步骤整合为一个应用程序。这将带来以下好处:
- 我们可以一次性定义应用程序逻辑,并自动支持多种调用模式,包括流式传输、异步和批量调用。
- 通过 LangGraph 平台 实现简化的部署。
- LangSmith 将自动对应用程序的各个步骤进行追踪。
- 我们可以轻松地为应用程序添加关键功能,包括 状态持久化 和 人工回路审批,同时只需进行极少的代码更改。
要使用 LangGraph,我们需要定义三个要素:
- 应用程序的状态;
- 应用程序的节点(即应用程序步骤);
- 应用程序的“控制流程”(例如步骤的执行顺序)。
状态:
状态 控制着应用程序的输入数据、各步骤间传递的数据以及应用程序的输出数据。
对于一个简单的 RAG 应用程序,我们只需跟踪输入问题、检索到的上下文以及生成的答案。
关于如何定义图状态的更多信息,请参阅 此处。
import { Document } from "@langchain/core/documents";
import { Annotation } from "@langchain/langgraph";

const InputStateAnnotation = Annotation.Root({
  question: Annotation<string>,
});

const StateAnnotation = Annotation.Root({
  question: Annotation<string>,
  context: Annotation<Document[]>,
  answer: Annotation<string>,
});
节点(应用步骤)
让我们从两个步骤的简单序列开始:检索和生成。
import { concat } from "@langchain/core/utils/stream";

const retrieve = async (state: typeof InputStateAnnotation.State) => {
  const retrievedDocs = await vectorStore.similaritySearch(state.question);
  return { context: retrievedDocs };
};

const generate = async (state: typeof StateAnnotation.State) => {
  const docsContent = state.context.map((doc) => doc.pageContent).join("\n");
  const messages = await promptTemplate.invoke({
    question: state.question,
    context: docsContent,
  });
  const response = await llm.invoke(messages);
  return { answer: response.content };
};
我们的检索步骤只是使用输入的问题运行相似性搜索,而生成步骤则将检索到的上下文和原始问题格式化为一个提示,供聊天模型使用。
控制流
最后,我们将应用程序编译成一个单独的 graph
对象。在这种情况下,我们只是将检索和生成步骤连接成一个单一的序列。
import { StateGraph } from "@langchain/langgraph";

const graph = new StateGraph(StateAnnotation)
  .addNode("retrieve", retrieve)
  .addNode("generate", generate)
  .addEdge("__start__", "retrieve")
  .addEdge("retrieve", "generate")
  .addEdge("generate", "__end__")
  .compile();
LangGraph 还提供内置工具,用于可视化应用程序的控制流:
// 注意:tslab 只能在 Jupyter Notebook 中运行。无需担心自己运行此代码!
import * as tslab from "tslab";

const image = await graph.getGraph().drawMermaidPng();
const arrayBuffer = await image.arrayBuffer();

await tslab.display.png(new Uint8Array(arrayBuffer));

我是否需要使用 LangGraph?
构建一个 RAG 应用程序不需要使用 LangGraph。实际上,我们可以通过调用各个组件来实现相同的应用程序逻辑:
let question = "...";

const retrievedDocs = await vectorStore.similaritySearch(question);
const docsContent = retrievedDocs.map((doc) => doc.pageContent).join("\n");
const messages = await promptTemplate.invoke({
  question: question,
  context: docsContent,
});
const answer = await llm.invoke(messages);
LangGraph 提供的好处包括:
- 支持多种调用模式:如果我们想要流式传输输出 token 或流式传输各个步骤的结果,则需要重写此逻辑;
- 通过 LangSmith 自动支持追踪,并通过 LangGraph Platform 自动支持部署;
- 支持持久化、人工参与循环以及其他功能。
许多用例要求在会话体验中使用 RAG,以便用户可以通过有状态的对话获得基于上下文的解答。正如我们将在本教程的第二部分中看到的那样,LangGraph 对状态的管理和持久化极大地简化了这些应用程序。
使用方法
让我们测试一下我们的应用程序!LangGraph 支持多种调用模式,包括同步、异步和流式传输。
调用:
let inputs = { question: "What is Task Decomposition?" };

const result = await graph.invoke(inputs);
console.log(result.context.slice(0, 2));
console.log(`\nAnswer: ${result["answer"]}`);
[
  Document {
    pageContent: 'hard tasks into smaller and simpler steps. CoT transforms big tasks into multiple manageable tasks and shed lights into an interpretation of the model’s thinking process.Tree of Thoughts (Yao et al. 2023) extends CoT by exploring multiple reasoning possibilities at each step. It first decomposes the problem into multiple thought steps and generates multiple thoughts per step, creating a tree structure. The search process can be BFS (breadth-first search) or DFS (depth-first search) with each state evaluated by a classifier (via a prompt) or majority vote.Task decomposition can be done (1) by LLM with simple prompting like "Steps for XYZ.\\n1.", "What are the subgoals for achieving XYZ?", (2) by using task-specific instructions; e.g. "Write a story outline." for writing a novel, or (3) with human inputs.Another quite distinct approach, LLM+P (Liu et al. 2023), involves relying on an external classical planner to do long-horizon planning. This approach utilizes the Planning Domain',
    metadata: {
      source: 'https://lilianweng.github.io/posts/2023-06-23-agent/',
      loc: [Object]
    },
    id: undefined
  },
  Document {
    pageContent: 'Building agents with LLM (large language model) as its core controller is a cool concept. Several proof-of-concepts demos, such as AutoGPT, GPT-Engineer and BabyAGI, serve as inspiring examples. The potentiality of LLM extends beyond generating well-written copies, stories, essays and programs; it can be framed as a powerful general problem solver.In a LLM-powered autonomous agent system, LLM functions as the agent’s brain, complemented by several key components:A complicated task usually involves many steps. An agent needs to know what they are and plan ahead.Chain of thought (CoT; Wei et al. 2022) has become a standard prompting technique for enhancing model performance on complex tasks. The model is instructed to “think step by step” to utilize more test-time computation to decompose hard tasks into smaller and simpler steps. CoT transforms big tasks into multiple manageable tasks and shed lights into an interpretation of the model’s thinking process.Tree of Thoughts (Yao et al.',
    metadata: {
      source: 'https://lilianweng.github.io/posts/2023-06-23-agent/',
      loc: [Object]
    },
    id: undefined
  }
]

Answer: Task decomposition is the process of breaking down complex tasks into smaller, more manageable steps. This can be achieved through various methods, including prompting large language models (LLMs) to outline steps or using task-specific instructions. Techniques like Chain of Thought (CoT) and Tree of Thoughts further enhance this process by structuring reasoning and exploring multiple possibilities at each step.
流步骤:
console.log(inputs);
console.log("\n====\n");
for await (const chunk of await graph.stream(inputs, {
  streamMode: "updates",
})) {
  console.log(chunk);
  console.log("\n====\n");
}
{ question: 'What is Task Decomposition?' }

====

{
  retrieve: { context: [ [Document], [Document], [Document], [Document] ] }
}

====

{
  generate: {
    answer: 'Task decomposition is the process of breaking down complex tasks into smaller, more manageable steps. This can be achieved through various methods, including prompting large language models (LLMs) or using task-specific instructions. Techniques like Chain of Thought (CoT) and Tree of Thoughts further enhance this process by structuring reasoning and exploring multiple possibilities at each step.'
  }
}

====
流式传输 tokens(需要 @langchain/core >=
0.3.24 和 @langchain/langgraph >= 0.2.34 并使用上述实现):
const stream = await graph.stream(inputs, { streamMode: "messages" });

for await (const [message, _metadata] of stream) {
  process.stdout.write(message.content + "|");
}
|Task| decomposition| is| the| process| of| breaking| down| complex| tasks| into| smaller|,| more| manageable| steps|.| This| can| be| achieved| through| various| methods|,| including| prompting| large| language| models| (|LL|Ms|)| to| outline| steps| or| using| task|-specific| instructions|.| Techniques| like| Chain| of| Thought| (|Co|T|)| and| Tree| of| Thoughts| further| enhance| this| process| by| struct|uring| reasoning| and| exploring| multiple| possibilities| at| each| step|.||
使用当前实现通过 .invoke 在 generate 步骤中流式传输 token,需要 @langchain/core >= 0.3.24 和 @langchain/langgraph >= 0.2.34。详细信息请参见此处。
返回来源
请注意,通过将检索到的上下文存储在图的状态中,我们可以在状态的
"context"
字段中获取模型生成答案的来源。有关返回来源的更多详细信息,请参阅此指南。
深入了解
聊天模型 接收一系列消息并返回一条消息。
自定义提示词(prompt)
如上所示,我们可以从提示词中心加载提示词(例如,这个 RAG 提示词)。提示词也可以轻松自定义。例如:
const template = `Use the following pieces of context to answer the question at the end.
If you don't know the answer, just say that you don't know, don't try to make up an answer.
Use three sentences maximum and keep the answer as concise as possible.
Always say "thanks for asking!" at the end of the answer.

{context}

Question: {question}

Helpful Answer:`;

const promptTemplateCustom = ChatPromptTemplate.fromMessages([
  ["user", template],
]);
查询分析
到目前为止,我们一直在使用原始输入查询执行检索。但是,让模型生成用于检索的查询有一些优势。例如:
- 除了语义搜索之外,我们还可以添加结构化过滤器(例如,“查找 2020 年以来的文档”);
- 模型可以将用户查询(可能具有多个方面或包含无关语言)重写为更有效的搜索查询。
查询分析 利用模型将原始用户输入转换或构建为优化的搜索查询。我们可以轻松地在应用程序中加入查询分析步骤。为了便于说明,让我们向向量存储中的文档添加一些元数据。稍后我们将对这些(人为构造的)文档部分进行过滤。
const totalDocuments = allSplits.length;
const third = Math.floor(totalDocuments / 3);

allSplits.forEach((document, i) => {
  if (i < third) {
    document.metadata["section"] = "beginning";
  } else if (i < 2 * third) {
    document.metadata["section"] = "middle";
  } else {
    document.metadata["section"] = "end";
  }
});

allSplits[0].metadata;
{
  source: 'https://lilianweng.github.io/posts/2023-06-23-agent/',
  loc: { lines: { from: 1, to: 1 } },
  section: 'beginning'
}
我们需要更新我们向量存储中的文档。为此,我们将使用一个简单的MemoryVectorStore,因为我们会使用它的一些特定功能(例如,元数据过滤)。有关您选择的向量存储的相关功能,请参阅向量存储integration 文档。
import { MemoryVectorStore } from "langchain/vectorstores/memory";

const vectorStoreQA = new MemoryVectorStore(embeddings);
await vectorStoreQA.addDocuments(allSplits);
接下来,我们为搜索查询定义一个模式。为此,我们将使用结构化输出。在这里,我们定义查询包含一个字符串查询和一个文档部分(“开始”、“中间”或”结束”),但你可以根据自己的需求进行定义。
import { z } from "zod";

const searchSchema = z.object({
  query: z.string().describe("Search query to run."),
  section: z.enum(["beginning", "middle", "end"]).describe("Section to query."),
});

const structuredLlm = llm.withStructuredOutput(searchSchema);
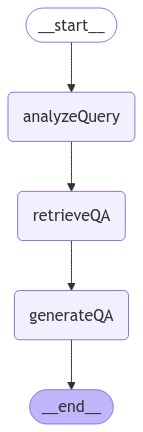
最后,我们在 LangGraph 应用程序中添加了一个步骤,用于根据用户的原始输入生成查询:
const StateAnnotationQA = Annotation.Root({
  question: Annotation<string>,
  search: Annotation<z.infer<typeof searchSchema>>,
  context: Annotation<Document[]>,
  answer: Annotation<string>,
});

const analyzeQuery = async (state: typeof InputStateAnnotation.State) => {
  const result = await structuredLlm.invoke(state.question);
  return { search: result };
};

const retrieveQA = async (state: typeof StateAnnotationQA.State) => {
  const filter = (doc) => doc.metadata.section === state.search.section;
  const retrievedDocs = await vectorStore.similaritySearch(
    state.search.query,
    2,
    filter
  );
  return { context: retrievedDocs };
};

const generateQA = async (state: typeof StateAnnotationQA.State) => {
  const docsContent = state.context.map((doc) => doc.pageContent).join("\n");
  const messages = await promptTemplate.invoke({
    question: state.question,
    context: docsContent,
  });
  const response = await llm.invoke(messages);
  return { answer: response.content };
};

const graphQA = new StateGraph(StateAnnotationQA)
  .addNode("analyzeQuery", analyzeQuery)
  .addNode("retrieveQA", retrieveQA)
  .addNode("generateQA", generateQA)
  .addEdge("__start__", "analyzeQuery")
  .addEdge("analyzeQuery", "retrieveQA")
  .addEdge("retrieveQA", "generateQA")
  .addEdge("generateQA", "__end__")
  .compile();
// 注意:tslab 只能在 Jupyter Notebook 内部运行。请勿尝试自行执行此代码!
import * as tslab from "tslab";

const image = await graphQA.getGraph().drawMermaidPng();
const arrayBuffer = await image.arrayBuffer();

await tslab.display.png(new Uint8Array(arrayBuffer));
我们可以通过特别要求提供帖子末尾的上下文来测试我们的实现。请注意,模型在其回答中包含了不同的信息。
let inputsQA = {
  question: "What does the end of the post say about Task Decomposition?",
};

console.log(inputsQA);
console.log("\n====\n");
for await (const chunk of await graphQA.stream(inputsQA, {
  streamMode: "updates",
})) {
  console.log(chunk);
  console.log("\n====\n");
}
{
  question: 'What does the end of the post say about Task Decomposition?'
}

====

{
  analyzeQuery: { search: { query: 'Task Decomposition', section: 'end' } }
}

====

{ retrieveQA: { context: [ [Document], [Document] ] } }

====

{
  generateQA: {
    answer: 'The end of the post emphasizes the importance of task decomposition by outlining a structured approach to organizing code into separate files and functions. It highlights the need for clarity and compatibility among different components, ensuring that each part of the architecture is well-defined and functional. This methodical breakdown aids in maintaining best practices and enhances code readability and manageability.'
  }
}

====
在流式步骤和 LangSmith 追踪 中,我们现在都可以观察到输入到检索步骤中的结构化查询。
查询分析是一个具有多种解决方法的复杂问题。更多示例请参考 操作指南。
下一步
我们已经介绍了构建基本问答应用程序的步骤:
在本教程的第二部分中,我们将扩展此处的实现,以支持对话式交互和多步骤检索流程。
延伸阅读: